Coloring Sprites with Cocos2d-iPhone
As someone who enjoys finding better ways to do things, I wanted to share a new tip I learned this weekend. Do you find yourself wrangling a handful of all too similar sprites, only varying by color? A useful pattern in game development is to keep the number of sprites in your project to a minimum by performing what's called a palette swap of the colors in the images. Fortunately for us, Ricardo Quesada's cocos2d iPhone game engine makes it a piece of cake to color your textures on the fly.
Credit for this idea goes to Codemattic from the cocos2d-iphone discussion group, but I thought it was worth expanding upon to spread the knowledge and throw some code around while I'm at it.
Let's gather our tools
Note: Code snippets in this article assume that you're using version 0.7.1 or later of cocos2d. If you're interested in grabbing the final product, you can download the finished project from GitHub. You can also browse the source tree or fork it for yourself at the GitHub project page.
To implement this demo, you will need to have a working cocos2d project to hack with. My code snippets will live in the SimpleGame project that I co-maintain over at GitHub. If you'd like to play along, grab a copy of SimpleGame and have it handy.
Also, grab a copy of the simple humanoid sprite to the right--we'll be adding it to our project to demonstrate the effect. You can either right-click on this link or save the image using your browser.
Implementation
Import your sprite and draw it
The first thing you'll want to do is open up the XCode project you'll be working with. Feel free to use your own cocos2d 0.7.1+ project, or use the provided one from above. From this point on, I'm going to assume you're using the provided project. If you have your own, I expect you'll know more about where the code should go than I do.
Once you're in XCode, right click on Resources in the project pane to the left and choose Add -> Existing Files... from the context menu. Browse to find your copy of the humanoid sprite from above and click Add. On the next dialog,
click the checkbox next to Copy items into destination group's folder (if needed) and then choose Add again.
Now that the sprite image is added to your project, let's write some code to display it on the screen. We'll be working in the GameLayer portion of the GameScene, so open up GameScene.m and find the init method on or around line 27.
Modify init to look like this, changing "ColorSprite.png" to whatever name you might have saved the image as:
- (id) init {
    self = [super init];
    if (self != nil) {
        isTouchEnabled = YES;

        // Add our original sprite to the layer
        Sprite *plainSprite = [Sprite spriteWithFile:@"ColorSprite.png"];
        [plainSprite setPosition:cpv(150, 160)];
        [self addChild:plainSprite z:0];
    }
    return self;
}
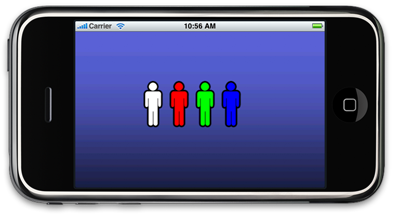
Assuming no typos, and that you've referenced the sprite filename correctly, hit Build and Go in the XCode toolbar to run the project. Once the app is running, choose the Start Game option on the menu and you'll something like what I have below. (I took the liberty of changing the background of the layer to make the screenshots clearer)
Color away
We're in a good spot now to see the power of coloring our sprite. To accomplish this, we'll add another copy of our sprite to the layer and employ the setRGB::: method to it.
Add the following block right below the three lines you added previously to the init method.
        // Add a red sprite onto the layer
        Sprite *redSprite = [Sprite spriteWithFile:@"ColorSprite.png"];
        [redSprite setPosition:cpv(200, 160)];
        [redSprite setRGB:255 :0 :0];
        [self addChild:redSprite z:0];
Notice the only difference in the above code is our use of the setRGB method on the sprite. Using standard RGB color values, you can theoretically tint your sprite into 16,581,375 colors. For this demo, we're sticking to the primary colors.
Also, and this is important, the math behind this method is ruthless--it works nicely with a white (RGB 0,0,0) pixel, but might do scary things to your orange boot sprite. I trust that you will use this tastefully.
Before you run the above code, let's add two more sprites right below it to really spruce things up.
        // Add a green sprite onto the layer
        Sprite *greenSprite = [Sprite spriteWithFile:@"ColorSprite.png"];
        [greenSprite setPosition:cpv(250, 160)];
        [greenSprite setRGB:0 :255 :0];
        [self addChild:greenSprite z:0];

        // Add a blue sprite onto the layer
        Sprite *blueSprite = [Sprite spriteWithFile:@"ColorSprite.png"];
        [blueSprite setPosition:cpv(300, 160)];
        [blueSprite setRGB:0 :0 :255];
        [self addChild:blueSprite z:0];
These two blocks will draw a green and blue copy of our sprite. If you've typed everything correctly, you can run the project now and see the brightly colored fruits of our labor.
Conclusion
I hope you find this trick as useful as I have. While we've covered a simple example where the entire sprite is tinted to one color, one could (and should) use this approach to create complex, layered sprites with interchangeable parts.
Trouble? Let me know in the comments, but feel free to grab a copy of the finished project if you're interested.
Update 4/29/2009: Cocos2d-iphone v0.7.2 has been released which includes two new actions, TintBy and TintTo, which might be of interest to readers of this post.